Monday, October 31, 2011
Thursday, October 27, 2011

Five of us from Backroad Quilters worked on a new banner for our chapter over the summer. Carolee came up with the idea and I was enthusiastic right from the start. I read about "slice" quilts quite a few years ago and always wanted to try it. Just Google "slice quilts" and you will find other images that will amaze you.
 Karen and her husband Joe came up with an image that was Photoshopped to create a typical house and barn in our rural area. The house, barn, mailbox, and other details were all from different locations. From that picture we had a full size poster made and cut that into five vertical strips. We each took a strip home and recreated the image in fabric over the summer. We did not confer with one another as to what we were doing, what fabrics we were choosing or methods we were using (well Karen and I talked a little bit since our pieces were side by side, but you wouldn't really know that we did!). The idea is to have the strips fit together to make the whole image but each strip is individual. I really like the differences in these quilts! The differences really make the piece so interesting.
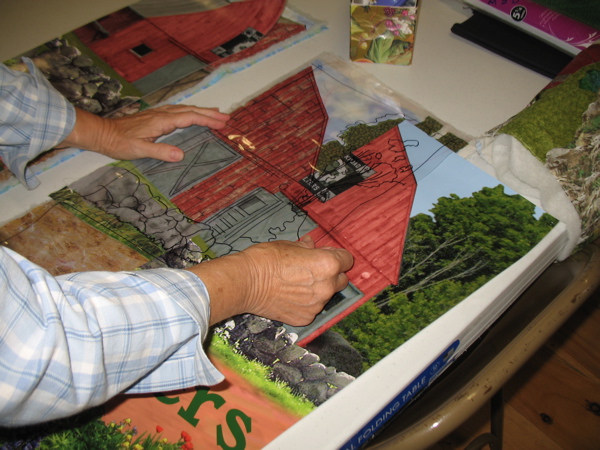
Here Carolee is placing a vinyl overlay over her poster slice and fabric slice to show how she put it all together. I did the same thing with mine. You place the vinyl over the photo and trace the outlines with a marker, that makes it easier to line up all the elements and get the right shapes.

Carolee painted her flowers. We all had the same road fabric and the same sky fabric. That brings some cohesion to the final quilt. Carolee and Lori had two halves of the barn and they both chose the same fabric!

I had the far left slice. I used a batik for the mail box that came out quite well, don't you think? I made the house twice, the first one just didn't work out. I pleated the fabric to make the clapboards and it looked really good, but the peak at the roofline just came apart. It's funny that Karen did the same thing and hers looks great. The rock wall behind the mail box was a challenge for all of us. Interesting to see how others handled that. I did not paint any of my slice, but others chose that method quite successfully. I used fusible web for my appliques. The yellow daylilies are waiting to be sprinkled among the leaves around the post.

Lori sewed the slices together. Doesn't she look happy? We all met at the snowmobile clubhouse and worked together one weekend to put it all together.

Voila!

We got it done in time for the Backroad Quilt show which was held last weekend. I think it looks awesome, how about you?
See the little piece above the barn door? That is our old banner-printed from a photo on fabric.
Saturday, October 15, 2011
Santa Fe Sunset

Santa Fe Sunset!
I made this wall hanging for the living room to hang above my new loveseat which is a sandy gold color with black wood trim. I've never been to Santa Fe, but this is how I imagine sunset would look like with a thousand stars in the night sky.

I used Eleanor Burns Radiant Star Quilts book for the basic layout and used her strip technique to sew the star together. EQ7 helped me audition colorways. Believe me I came up with a hundred different colorways! The quilt measures approximately 52x52.
I embroidered the black squares and triangles with DMC #5 perl cotton. Then I added the gold sequins and beads. Lots of sparkle! It really twinkles when the lights are low.

The quilting was done on my domestic Janome sewing machine. I made another lone star quilt a few years ago and quilted it the same way. I used the free motion mode zig zag and stitched through the center of each diamond.

A few more sparklies in the center...

My DD took some macro shots with my camera. Cool!
I free motion stitched the borders with some loopy loops and spirals.
Santa Fe Sunset will be shown at the Backroad Quilters show in West Gardiner, Maine next weekend. Come and see!
Sunday, October 9, 2011
October Blessings

Today DD and I went to beautiful Popham Beach. Apparently it was bring your horse day as we saw at least eight horses there. The horses were beautiful, the day was beautiful. Today was the last breath of summer in Maine and a good day to take in the sun, sand, and sea.


Here's my latest project. I'm calling it Santa Fe Sunset. Never been to Santa Fe, but I would love to go there. I used Eleanor Burns' book Radiant Star Quilts for cutting instructions. I tested many, many colorways on EQ7 before coming up with this one. I made the star and then chose the black background. Black really makes the colors pop!
We bought a new sofa and loveseat this summer so I thought a new wallhanging was in order. The sofa is black leather and the loveseat is a dull gold with black wood trim. When I stand in front of the wood stove in the kitchen this winter I will be able to look at my Santa Fe star.

I've been wanting to add embroidery to a quilt and decided to try it on this one. I used a special pen from Clover that works better than anything I have ever tried before. I love my Chaco chalk marker, but I really like this pen from Clover, too. It is just like an ink pen. You don't see the white line immediately, it takes a couple of seconds for the line to appear. To remove simply run an iron over the lines and they are GONE!
I made a one inch square grid with the marker. I used DMC perl cotton #5 to make lazy daisy Xs in each square. Next comes the sparkle! I am going to add gold sequins and beads. I finished the machine quilting today and added the binding. Now I will sew on, well, best not to count how many, the sequins and beads.
I am trying to get this done for the Back Road Quilt Show in West Gardiner, Maine on Saturday Oct. 24 and 25. I think I can get it done!
Oh, I've also signed up for a silk ribbon class on Quilt University. Lesson 1 started Friday. Behind already, ha ha!

Happy Thanksgiving to all my friends in Canada!
Subscribe to:
Posts (Atom)